How to connect the XTL500 Label Maker to your Computer
Connecting the XTL500 Label Maker to your Computer
The label maker can be used as a standalone label maker or you can print labels directly from your computer using the latest version of DYMO ID™ software. Using DYMO ID™ software is the recommended method for producing a high volume of labels.
Downloading and Installing DYMO ID™ Software
Do not connect the label maker to your computer until after the software installation is complete. To install the software:
- Download the latest version of DYMO ID™ software from the DYMO Web site at support.dymo.com.
- Follow the instructions in the installer.
Connecting the Label Maker to your Computer
The label maker connects to your computer using the USB connection located on the left side of the label maker. Do not connect the label maker to your computer until after the software installation is complete.
To connect the label maker to your computer:
- Lift the connector cover on the left side of the label maker and turn to expose the connectors.
- Plug the USB cable into the USB connector on the label maker and into an available USB port on your computer.
The label maker display will show Connected to PC and you will not be able to use the label maker keypad.
Each time you connect the label maker to the computer, DYMO ID™ software will automatically start.
You can now print directly from DYMO ID™ software or transfer labels to the label maker for printing later.
About DYMO ID Software
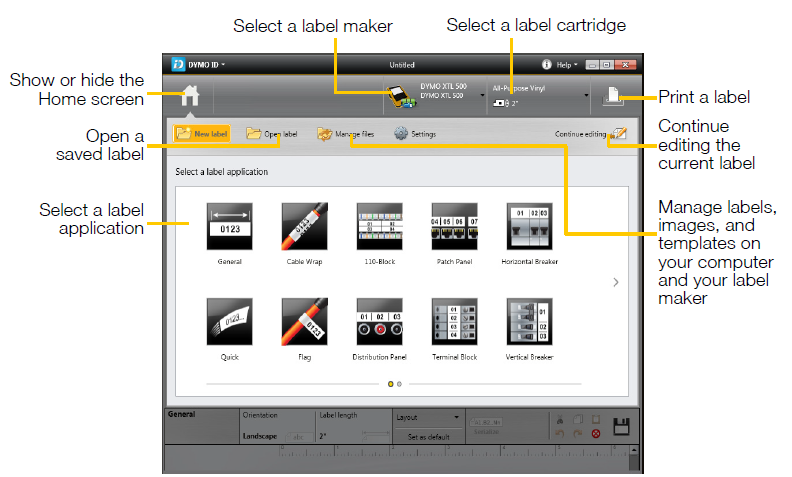
The following figure shows some of the major features available with DYMO ID™ software.
For complete details on using the software, refer to the online Help or the DYMO ID™ User Guide.
From the Help menu in DYMO ID software, you can view the following:
- DYMO ID™ Help
- DYMO ID™ User Guide
Transferring Files
You can transfer label files and images to and from your label maker through DYMO ID™ software. You can also download and transfer the latest templates to the label maker.
Refer to the DYMO ID™ software online Help or user guide for complete information on transferring files.
Updating the Label Maker Software
Periodically, updates will become available for the label maker or the label templates. When the label maker is connected to your computer, you will be notified from within DYMO ID™ software when an update is available. You complete these updates from within the software.
You will only be automatically notified of a label maker update when the label maker is connected to your computer. To manually check for label maker updates:
- From within DYMO ID software, select About > Label makers from the DYMO ID menu.
- Select your connected label maker.
- If an update is available, follow the instructions when prompted by the software.
- When update is complete, turn the power off and then on again.
Press and hold the power button for at least five seconds to make sure the power is completely off and not just in standby mode.
Refer to the DYMO ID™ software online Help or user guide for information about label maker software or template updates.